Translated from English by gtranslate.io
Sidebar
manual:advanced:map_tools:conversion
This is an old revision of the document!
Table of Contents
Maps2mapc
This page is obsolete and will be reworked soon
How create a sqlitedb file with Maps2mapc
Basic information
- Firstly, suggest to test working demo version if this fits your needs. Here is description from author of MAPC2MAPC, how to…
- In case you'll be satisfied, I suggest to buy full version by Buy button on bottom of manual page. Thanks to this, you'll get 10% discount of this product
- MAPC2MAPC: http://www.the-thorns.org.uk/mapping/
Additional knowledge base information
Additional forum information
http://forum.locusmap.eu/viewtopic.php?f=10&t=413&p=1876&hilit=MAPC2MAPC#p1876
http://forum.locusmap.eu/viewtopic.php?f=21&t=4&p=4874&hilit=MAPC2MAPC#p4874
http://forum.locusmap.eu/viewtopic.php?f=44&t=899&p=5043&hilit=MAPC2MAPC#p5043
http://forum.locusmap.eu/viewtopic.php?f=21&t=3&p=6142&hilit=MAPC2MAPC#p6142
http://forum.locusmap.eu/viewtopic.php?f=21&t=3&p=12802&hilit=MAPC2MAPC#p12802
Various
How to convert Netherlands TOP25raster
The Netherlands kartographic service PDOK offers topographic map Topo25raster for free. These map are provided in geoTiff format in local coordinate system. Locus is not able to handle geoTiff format for this reason is needed to convert these data manually.
This tutorial is prepared for Windows system but especially GDAL utilities work little bit better on Linux systems.
Download data
- Whole Netherland is devided into section – download section which is suitable for you
Use GDAL for transformation
Install GDAL
- For purpose of this tutorial download gdal http://www.gisinternals.com/sdk/PackageList.aspx?file=release-1600-gdal-1-10-0-mapserver-6-2-1.zip
- Download gdal-110-1600-core.msi installer
Transform downloaded geotif
- Open command line (CMD) and go to the GDAL installation folder (in our case cd C:\Program Files (x86)\GDAL)
- Transform downloaded geoTiff into WGS84 system
set GDAL_DATA=.\gdal-data
gdalwarp -t_srs EPSG:4326 44a-top25raster-2010.tif  44a-top25raster-2010-4326.tif
Generate map using Mapc2Mapc into Locus format
- Download and install SW Mapc2Mapc http://www.the-thorns.org.uk/mapping/down.htm
- Start Mapc2mapc and set the location of gdal_translate
- Edit > Locate > GDAL_translate (choose path to the installation folder of gdal)
- Open transformed geoTiff
- File > Load Calibrated map
- Export file for Locus
- File > Write map for Mobile devices
- Choose Locus/RMAPS sqlitedb
- Set zoom levels
- optional: check Make tile margins transparent
- Press OK and confirm all zoom levels which will be generated
Import map into Locus
- Copy generated sqlitedb map into your device folder Locus/maps
- Start Locus
Red crosses
- The demo version of mapc2mapc will add random red crosses over the map. This is limation of free/demo version
How To Convert Shp File For Locus
- Locus type: <html><b><a href=“https://play.google.com/store/apps/details?id=menion.android.locus&referrer=utm_source%3Ddocs%26utm_medium%3Dheader%26utm_content%3Dhow_to_convert_shp_file_for_locus” target=“_blank”>Free</a>/<a href=“https://play.google.com/store/apps/details?id=menion.android.locus.pro&referrer=utm_source%3Ddocs%26utm_medium%3Dheader%26utm_content%3Dhow_to_convert_shp_file_for_locus” target=“_blank”>Pro</a></b></html>, 2.3.0+
- Last updated manual: 2.3.0
Basic information
Locus basically does not support SHP file at this moment. On the other hand there are some possibilities how to covert SHP to the different format that is possible to import into Locus.
Convert SHP file to KML
Probably the easiest way is convert SHP file into KMZ file which is fully supported by Locus. Unfortunately there is a limitation in size of KML file. The limit for Locus is about 5000 – 10000 points depends on your device.
- Download free tool Shp2kml http://www.zonums.com/files/Shp2kml.zip
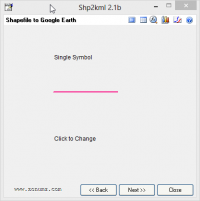
- Unzip and run shp2kml.exe
- On the first screen select file for convert

- Define color for lines/polygons
- Skip balloon definition screen
- On the last screen define name of layers and description

- Create KML file
- Copy created KML file into Locus/mapItems
- Run Locus and go to the Data manager > tab Items

Convert SHP to Mapsforge format
In this example we expect that shp file for converting is very simple. Unfortunately converting is little bit tricky and requires a specific approach for particular SHP files. So it is not possible to say that this example could be used for every SHP file.
For this example we use free shp data (Czech Republic boundaries ) download-able at http://gadm.org/data/shp/CZE_adm.zip.
SHP file to OSM format
There are lots of possibilities how to do it - see http://wiki.openstreetmap.org/wiki/Shapefiles. In this example we use Merkaartor SW.
- Download Merkaartor http://merkaartor.be/wiki/merkaartor/Download
- Run it and open SHP file for converting
- Export OSM: File > Export > OSM (XML)
- Note: Merkaartor place
<bound>tag in the end of osm.xml file. You need move it and place whole tag before first geometry element
- cze_adm.osm
<?xml version="1.0"?>
<osm generator="Merkaartor 0.17" version="0.6">
   <bound box="48.540841,12.085860,51.054381,18.862533" origin="http://www.openstreetmap.org/api/0.6"/>
  <node version="0" lon="14.4138160" lat="49.2553340" timestamp="2013-04-28T10:55:33Z" user="" id="-1" actor="0"/>
...
...
...
Mapsforge map writer plugin
Osmosis
- Download and install osmosis 0.40.1 http://bretth.dev.openstreetmap.org/osmosis-build/osmosis-0.41.zip
- Note: there are newest version of osmosis but Map writer plugin does not work properly with them
- More details about osmosis http://wiki.openstreetmap.org/wiki/Osmosis/Installation
Map writer plugin
- Download Mapwriter plugin mapsforge-map-writer-0.5.0-jar
- Copy downloaded plugin into osmosis folder osmosis/plugins .
- More about installing Map writer plugin: https://github.com/mapsforge/mapsforge/blob/master/docs/Getting-Started-Map-Writer.md#plugin-installation
Define custom tags for generation of map file
- Map writer plugin uses a XML file(tag-mapping.xml) which contains pairs of known tags for generation. This xml define which OSM element will be included in the map file.
- Use Merkaartor or arbitrary GIS/DBF viewer and decide which SHP attributes you want to export to the map file.
- For this example we create
tag-mapping-shp.xmlfile based on tag_ENGTYPE_2_

- tag-mapping-shp.xml
<?xml version="1.0" encoding="UTF-8"?>
<tag-mapping xmlns="http://mapsforge.org/tag-mapping" xmlns:xsi="http://www.w3.org/2001/XMLSchema-instance"
	xsi:schemaLocation="http://mapsforge.org/tag-mapping ../resources/tag-mapping.xsd" default-zoom-appear="16"
	profile-name="default-profile">

	<!-- CZE_ADM_2 -->
	<ways>
	    <osm-tag key="_ENGTYPE_2_" value="District" zoom-appear="4" force-polygon-line="true" />
            <osm-tag key="_ENGTYPE_2_" value="Statutory city" zoom-appear="4" force-polygon-line="true"/>
	</ways>
</tag-mapping>
Generate map file
- Run generation
bin\osmosis.bat --read-xml cze_adm.osm --mapfile-writer file=cze_adm.osm.map type=ram tag-conf-file=tag-mapping-shp.xml bbox-enlargement=0
- More information about generation and Mapwriter plugin https://github.com/mapsforge/mapsforge/blob/master/docs/Getting-Started-Map-Writer.md
Create vector theme for rendering
- We’ve generated vector map and in next step we need to define appearance of geometry. Appearance is defined via theme XML.
- You can edit any free theme for Locus or create new one which will be created especially for your SHP file.
- Create theme xml (in our case
cze_adm_theme.xml)
- cze_adm_theme.xml
<?xml version="1.0" encoding="UTF-8"?>
<rendertheme xmlns="http://mapsforge.org/renderTheme" xmlns:xsi="http://www.w3.org/2001/XMLSchema-instance"
	xsi:schemaLocation="http://mapsforge.org/renderTheme ../renderTheme.xsd"
	locus-extended="1" fill-sea-areas="0" version="1" map-background="#00FFFFFF">

	<!-- Render Boundaries -->
 	<rule e="way" k="*" v="*">
		<rule e="way" k="_ENGTYPE_2_" v="District" >
                        <line stroke="#FF3E96" stroke-width="4" />
		</rule>
		<rule e="way" k="_ENGTYPE_2_" v="Statutory city">
			<line stroke="#B56904" stroke-width="4" />
		</rule>
	</rule>
</rendertheme>
Copy map and theme to the device
- Copy vector map file
cze_adm.osm.mapinto folderLocus/mapsVector - Copy theme xml into folder
Locus/mapsVector/_themes

manual/advanced/map_tools/conversion.1432211614.txt.gz · Last modified: 2015/05/21 15:33 (external edit)
Except where otherwise noted, content on this wiki is licensed under the following license: CC Attribution-Share Alike 4.0 International
