Translated from English by gtranslate.io
Sidebar
manual:user_guide:tools:dashboards
This is an old revision of the document!
Table of Contents

Dashboards
About
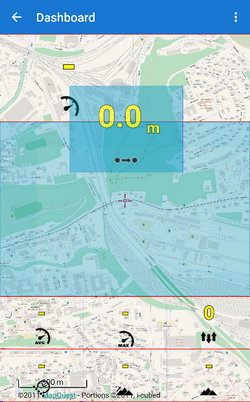
The dashboard displays additional information (digits and charts) above the map. It is helpful for sports tracking, geocaching, navigation, etc. In general, the layer is touch-insensitive but it can contain some action buttons too - e.g. track recording controls.
There are several pre-set dashboards for direct use. All of them can be modified, others can be downloaded and it is possible to create new dashboards from scratch.
Selection
- Menu > All features > Tools > Dashboard
- tap a dashboard to activate it above the map (or tap again to deactivate). The last used dashboards are on top of the list.
Quick activation
You can de/activate a dashboard from the selection panel but it is too deep in the menu. You can do so much faster.
- add the dashboard toggle button to a Functions panel for fast switch on/off.
Creating a new dashboard
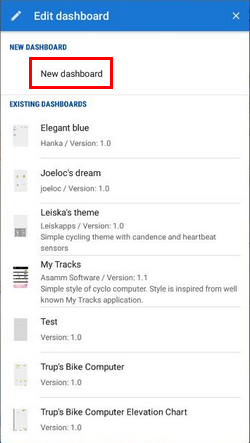
- open Dashboard editor and tap +:
- insert name of the new dashboard
- a basic grid of editable cells appears:
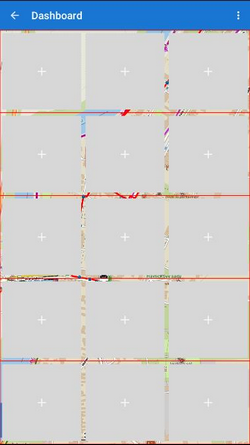
- each cell can contain text label, function output, chart, or a track recording control
Adding content
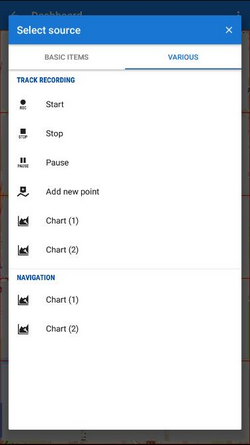
Tap a cell to add content to it. Select source box offers two tabs of items:
- Features:
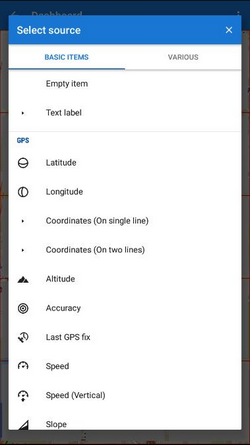
The screenshot displays only the upper part of the scroll, there are much more parameters. - Controls, charts:
When you select an item, it appears in the selected cell.
Tools
To change the style of the item, add cells or delete them, tap the active cell. A toolbox opens:

- Add new cell - adds a new cell on the left, right, above or below the selected cell
- Cell options:
- Change source - displays a selection of function outputs to replace the current one
- Edit - settings of texts, icons, units, their design and positioning, background color, shape, size, padding, and margin of the cell. All can be checked in a preview.
- Copy style/Paste style - useful when cloning cells, especially when editing an already existing dashboard
- Delete - deletes the cell - surrounding cells take its space
- Rows options
- Edit row - sets the whole row background color, shape, and size
- Copy style/Paste style - useful when cloning whole rows, especially when editing an already existing dashboard
- Delete row - deletes all cells in the row - their space is taken by rows above or below
To move a cell, long-press, and drag/drop it to the desired position.
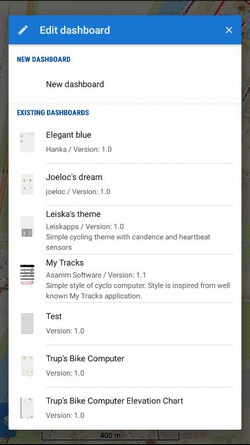
Using an existing dashboard as a template
You don't have to create a completely new dashboard from scratch. You can edit an already existing one and use it as a template.
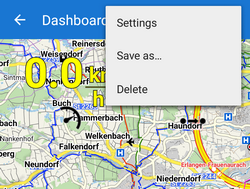
The principle of editing is the same as when creating a new dashboard but the main layout and some formatting are already done. Just select a dashboard that suits your needs the best from offered themes and select Edit from its menu:
Then you can edit it, overwrite it and/or select Save as… to create a new theme.
Settings
Changes of settings, renaming, deleting and other edits are done in the Dashboard editor
- Menu > More functions > Dashboard editor
- select a dashboard to edit
- go to topbar
 menu > Settings
Options to set

- Name and version, description and author - all editable
- Close by the button “back” - check this if you want to close the dashboard by the HW “back” button of your device. Otherwise, the dashboard can be preserved in ON position for the next launch of Locus Map
- Resize by top panel - your dashboard will cover only the map screen and will not interfere with top panel- it will be resized by it
- Resize by the bottom panel - your dashboard will cover only the map screen and will not interfere with bottom panel- it will be resized by it
manual/user_guide/tools/dashboards.1662647427.txt.gz · Last modified: 2022/09/08 16:30 by mstupka
Except where otherwise noted, content on this wiki is licensed under the following license: CC Attribution-Share Alike 4.0 International
