Translated from English by gtranslate.io
Sidebar
manual:user_guide:tracks:webplanner:main
This is an old revision of the document!
Table of Contents
Web route planner & library
…in development…
Mobile application Locus Map has also its web counterpart available at web.locusmap.app. It does not work as a full-stack app but it can do pretty much:
- browse hike/bike and winter LoMaps and global satellite maps
- plan routes
- import/export routes
- import user points
- display tracks/routes and points on the map
- search places and points of interest
- sync with your mobile app on multiple devices Premium Gold only
Maps
Controlling
The map can be shifted by clicking and dragging, and zoomed with the mouse wheel. There are also zooming buttons in the top right corner:
 To change the displayed map, select from the map selection:
 To center the map on your approximate location, tap the centering button (the browser will need your permission to catch your location):

LoMaps
The default map for hiking, biking and other summer outdoor activities. Available worldwide in 18 zooms down to the scale 1:5000, based on topographic content with shadowed terrain and elevation contour lines. It displays a layer of lines of the marked routes for various outdoor activities and dynamic points of interest - LoPoints.

LoMaps Ski
Map for winter outdoor sports - backcountry, nordic, downhill skiing, snowshoeing etc. The topographic background is the same as on summer LoMaps, special winter LoPoints are added.

Both maps are generated from OSM data and are updated every 24 hours. For the map symbols' description, see the Map legend.
Satellite
Map consisting of the satellite and aerial imagery by HERE and Maxar. Available in 17 zooms down to approx. 1:10000 scale.

Satellite with labels
besides the aerial imagery, the map contains also road/street numbers and names and house numbers.

Route planning
A quick sample:
<html><iframe width=“800” height=“600” src=“https://www.youtube.com/embed/q9xQgnIADe8?controls=1” title=“YouTube video player” frameborder=“0” allow=“accelerometer; autoplay; clipboard-write; encrypted-media; gyroscope; picture-in-picture; web-share” allowfullscreen></iframe></html>
1. Select activity
The first step is to select an activity for which the route will be created. The planner offers two walking, three biking, two driving, one cross-country skiing and one manual drawing mode.

The manual mode is useful only when you draw the route in a free terrain or when the routing data for a particular area is missing:
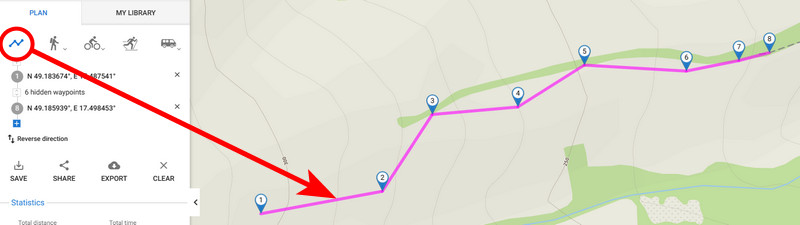
2. Add route points
The route is created the same way as in the app. The simplest way is to click the route points directly on the map on roads and paths.
The first click must be done with the right mouse button and selecting the “Start here” option:
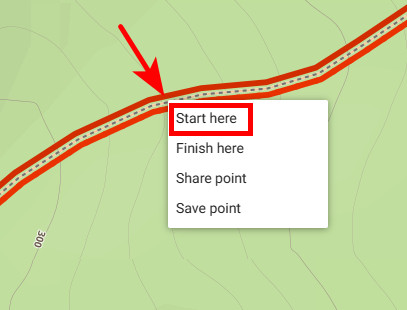 This way the planner switches into the drawing mode and you can add other route points by left-clicking. By shifting the cursor above the route line between the points a new point emerges and by dragging it you can change the route progress:
 You can move any of the route points at any time and the route always reroutes accordingly.
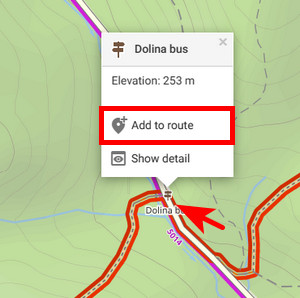
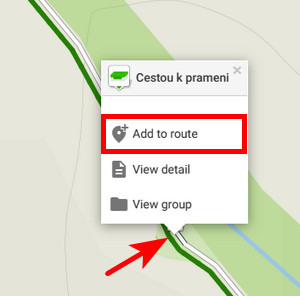
Adding LoPoints
You can also add LoPoints to your route. Shift the cursor on the LoPoint, and a popup emerges. Click on Add to route.
Adding user points
To add your own point to the route, proceed the same way as with LoPoints:
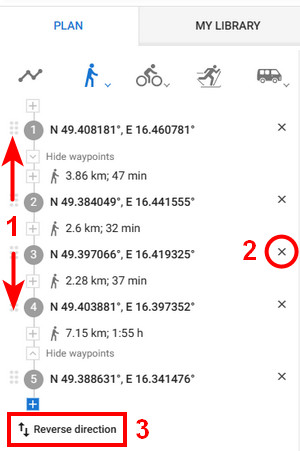
Changing order, deleting, reverse direction
The route points are lined up in an itinerary displayed on the panel on the left. You can change their order by click-and-drawing them up or down the line (1), delete them (2), or reverse the course of the whole route (3):
manual/user_guide/tracks/webplanner/main.1675251912.txt.gz · Last modified: 2023/02/01 12:45 by mstupka
Except where otherwise noted, content on this wiki is licensed under the following license: CC Attribution-Share Alike 4.0 International
