Table of Contents

About Tracks & Routes
What is the difference between a route and a track?
- Tracks act like breadcrumb trails, allowing you to see where you or another individual traveled in the past. Tracks contain track points, not waypoints or points of interest. They provide a record of where you have been and when to later determine your path and speed.
Locus Map can record tracks and import already recorded tracks from other sources.
- Routes are generally made up of a series of significant points along your path. Locus Map will tell you the bearing and distance to the next point in sequence as you navigate along your route. Each point is usually named (in fact, a route is usually just a sequence of waypoints). Routes can be planned directly in Locus Map point by point or Locus Map can calculate it for you.
Actually Locus Map can transform a previously recorded track into a route and navigate along it.
Tracks & routes on map
Activating one by one
- open Track&routes manager > (group of folders) > folder
- tap
 next to the track(s) you want to display on the map. It changes into
  and highlights:
 . All highlighted tracks are displayed on the map.
Activating in a batch
- open Track&routes manager > (group of folders) > folder
- tap in the bottom bar and select from the options:

Activating the whole folder
- tap the folder icon:
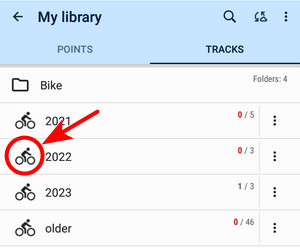
- to deactivate all tracks in the folder, tap the icon again
Deactivating
To hide track/routes from the map screen, revert the procedures described above. Plus there are a few more options:
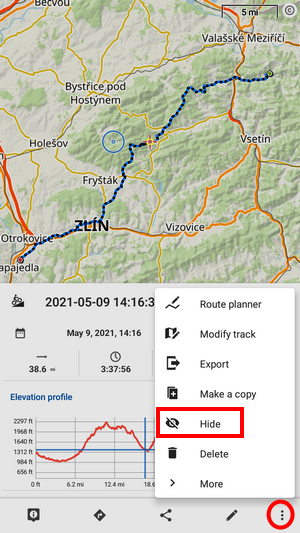
- to hide a single track, tap it on the map and select hide from the bottom menu:
- to hide all tracks/routes, tap deselect all in the track manager topbar:

Track&route detail panel
When you tap on a track/route in the track manager folder, the detail panel emerges. The upper part is filled with a map preview of the track. Tapping the centering button opens the map screen with the track aligned in the center:
When you tap a track on the map, the detail panel slides up from the bottom:

Statistics
The upper part contains the track name (1), date of creation (2), and basic stats of the track/route (3). Tapping the arrow button on the right maximizes the stats screen:

Elevation chart
The elevation chart (4) displays the position of the tapped trackpoint. Maximizing button unfolds the chart to the more detailed version:

The trackpoint is highlighted there too, including related graph values (here with elevation and slope %).
The bottom toolbar:
 graph settings - here you can set the X-axis parameter (distance/time) and two parameters for the Y-axis (altitude, slope, speed, heart rate, and cadence - if appropriate sensors are connected)
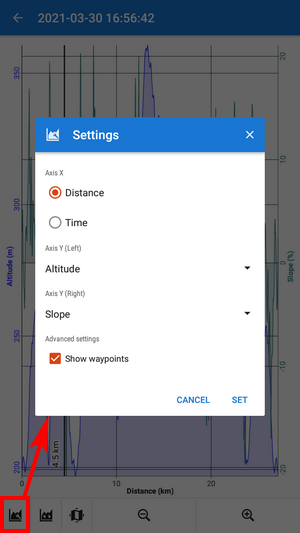
 returns the whole graph into the box when it is zoomed out
 if you tap on the chart once more, this shows the trackpoint on the map
- +/- zoom the chart in/out
More details emerge when you slide the track detail panel further up:
Way types and surfaces
Available only with Premium Gold
The way types and surfaces along the route are displayed only if the route is planned in the Locus Map route planner using LoRouter:

When you tap the way type or surface graph the description is shown. ![]() shows the way types/surfaces along the route in %:
shows the way types/surfaces along the route in %:

Waypoints
The main waypoints along the route are displayed as icons:

To display a list of all of them including navigation waypoints, maximize the box with the arrow button:

Each waypoint can be edited or deleted (![]() menu). To add more waypoints, copy or move them, tap the red + button:
menu). To add more waypoints, copy or move them, tap the red + button:

Best interval
When the track is recorded and contains time data, here you can see the best interval on the track:

Maximizing the box shows all intervals along the track. The track length can be set in the topbar:

Toolbar
The toolbar at the bottom of the track detail panel offers a wide range of tools divided into categories:
 - trackpoint detail screen
 - sharing methods
 - editing info and style
 - menu of other tools
Trackpoint detail
Each track or route consists of track- or route points. Tapping the icon in the corner opens the detail screen with information about the particular point:
At first the panel is slid up only partially, showing the distance to the trackpoint and its elevation. The distance is a combination of the distance to the closest point of the track and then along the track to the selected trackpoint. Further sliding up shows full detail:

- Track - name and folder, arrow buttons to move among other track points along the track
- Statistics - distance, time and elevation gain to the start of the track and to its end
- Location - GPS coords, actual speed, azimuth of the device, GPS accuracy, and date of creation
Trackpoint toolbar
 - back to the track detail
  - creates a new point on the track point position
 - starts navigation or guidance to the track point
 - opens tools of related add-ons (e.g. nearest geocaches)
- - options of sharing the track point
 - local weather forecast
Navigation/guidance
Tapping the button opens a selection dialog where you can start navigation or guidance along the route.

Sharing
Another bottom bar menu offers track/route sharing options:

- Share by link - the app generates a link that you can send to your friends via a favorite app or service:
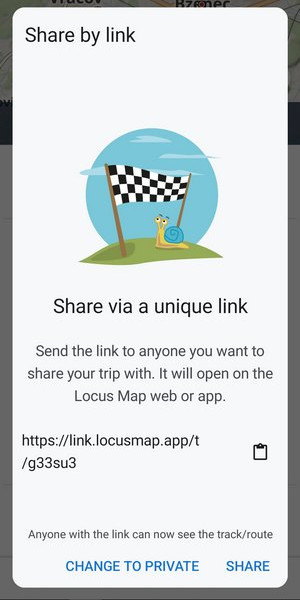
Anyone with the link can display the route. When opened in a browser, the route is displayed on Locus Map Web Planner. When clicked on a phone or tablet with Locus Map installed, the route is displayed in the app's route planner. Shared route is marked both in its detail and in the folder:


When you edit the route later in the app, the change is synced with the cloud even if you don't have Premium Gold! If you want to stop sharing the route, tap Change to private in the sharing dialog.
- Share as GPX - Locus Map offers other available apps through which you can send your track/route quickly as a GPX file
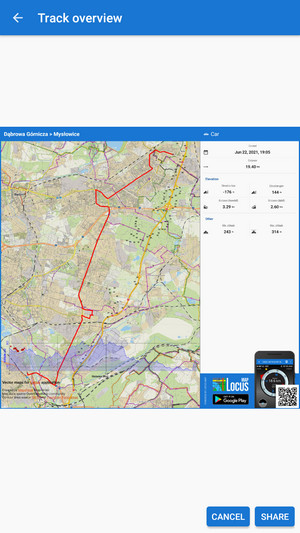
- Track overview - Locus Map generates a hi-res JPG with the track map and statistics. This can be shared via any available app on your phone.
Editing info
Here you can edit the name, description, activity type, folder and the line style of the track/route:

Menu of other options

- Re-route - opens the track/route in the route planner for re-planning
- Edit track - opens the track/route in the track editor for repairs or detailed editing
- Export - opens the export center where you can select the file format or an external service for export
- Make a copy - creates a copy of the track/route. You can rename the copy, select a folder, reverse its direction, or add navigation prompts:
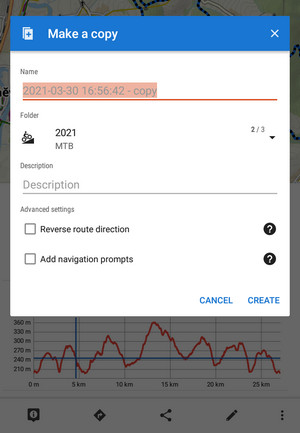
Reverse the route only for offroad use! Navigation commands on a reversed route don't reflect the traffic situation accurately.
- Hide - removes the track/route from the map screen
- Delete - removes the track/route from the app - this is irreversible!
Tools
The second level of the menu contains more advanced options:

- Update elevation - Available only with Premium - adds or updates elevation data of the track/route for elevation gain and chart
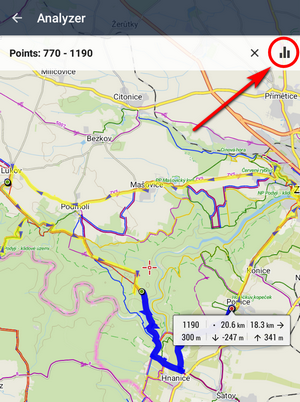
- Analyzer - useful when you need to know statistics and charts of a particular part of the track or route:
- tap the track on the place from which you want to define the span
- tap the other point of the span. You can repeat this step and change the span definition.
- check the general stats and elevation chart in the bottom bar

When you want to see detailed statistics and charts, confirm your selection:
The selected track part is displayed in a new detail window with info, stats and chart tabs:
To share the track part, select an option from the Share menu:

To make a copy of the track part, to export it, compute the area covered by it or calculate its estimated travel time, select from the tool menu:

- Weather - local weather forecast
- Compute area - calculates the area covered by the track/route
- Estimated travel time - calculates the route time according to the selected activity. More here >>
- Itinerary - list of waypoints along the route, sorted by the distance from the start:
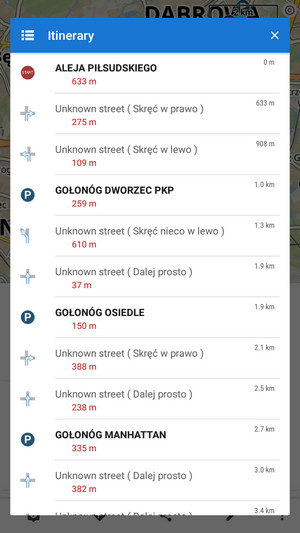
To display a particular waypoint on the map, tap it.