Table of Contents

Route Planning
About routes
Routes are strings of routepoints along which user is navigated during his activity - hiking, biking etc.
Routes are pre-planned, drawn on a map or imported and put into navigation devices so that we can travel along their lines. Tracks that were recorded by you or someone else can be turned into routes when we need to navigate them.
Routes can be drawn manually on the map or automatically by a router. Locus Map provides several methods of creating routes:
- Route planner - tool for manual and automatic drawing of routes with routing service assistance
- Changing tracks to routes - using tracks as routes for navigation
Route planner
Quick reference
For a quick reference, check the basics video tutorial:
How to start it
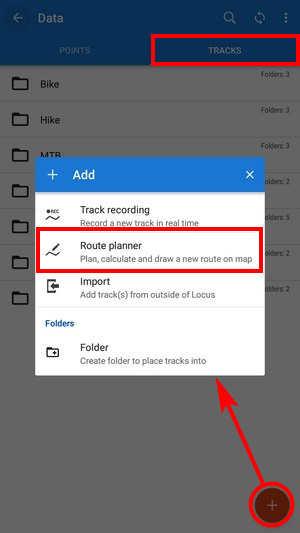
The planner can be started in several ways:
- Menu > Route planner
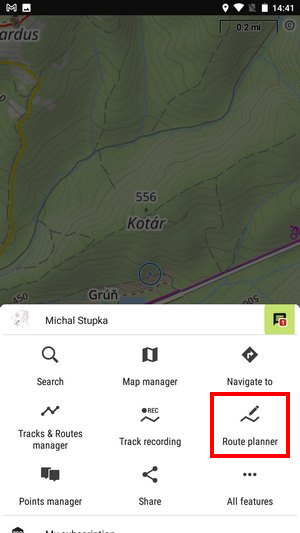
- Menu > Tracks > + > Route planner


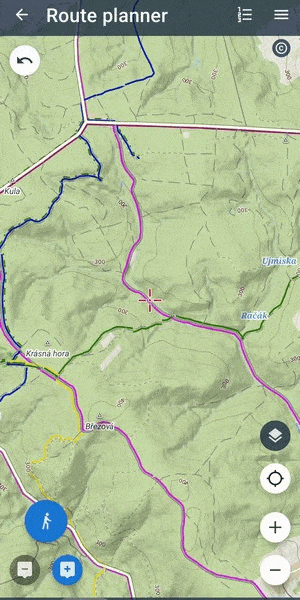
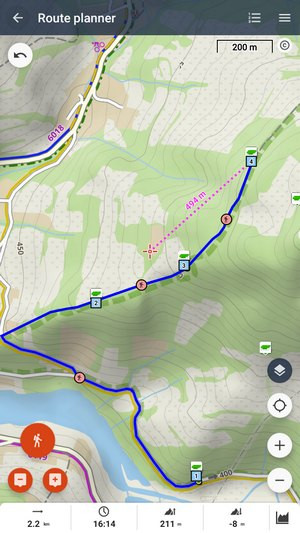
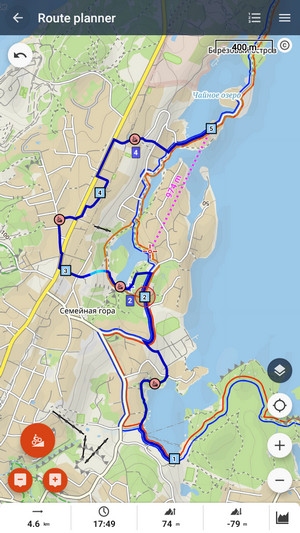
Route planner screen

- Drawing mode selector - select among various routing modes, or the manual mode. The currently active mode is indicated on the button.
- add/remove route shaping points
- back/forward - move along planning process steps
- content panel - slides out a panel with a selection of maps and other layers
- centering - centers the screen on your current GPS location
- zooming - zooms the map in or out (buttons can be hidden in route menu > settings)
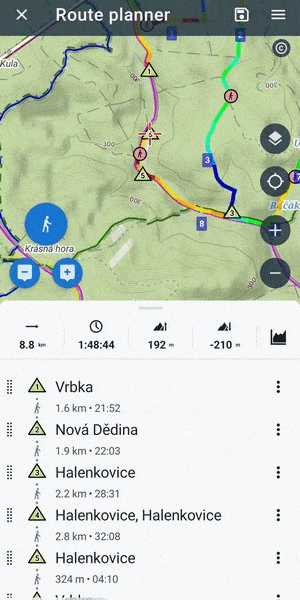
- basic stats - length, estimated time, elevation gain/loss
- graph tab switch opens the elevation chart and surface/way type graphs:
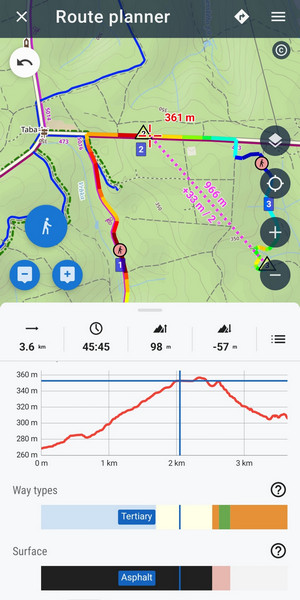
- itinerary - dynamic list of shaping or via point on the route

The top bar - contains Save/Navigate button and the Route menu.
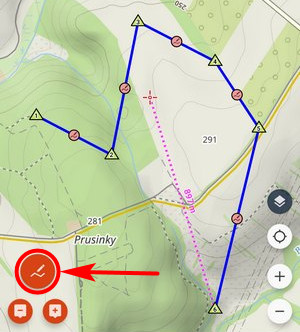
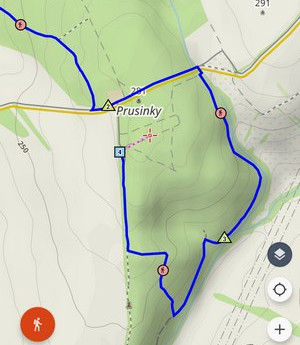
Route line

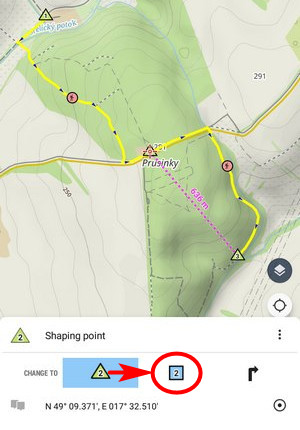
 shaping point - basic point building the route, can be changed into via point.
 segment point - forms on the line between shaping points. Changes to a new shaping point when shifted. Indicates the activity for which the route segment was planned. Tapping it opens the option to re-calculate the segment in a different profile.
 via point - place through which you want to go during navigation. Its name is announced by voice navigation when you navigate the route.
When a routing mode is on, the line between points runs along roads and paths. If you choose to draw manually, the line is straight between points, unrelated to roads.
Drawing instructions
Add shaping points
The route is built with shaping points ![]() added on map:
added on map:
- by tapping
 (points are added on the cursor position)
 - by tapping directly on the map (this option can be turned off in the route menu)
The route line, rendered between shaping points, contains also segment points ![]() . Both shaping and segment points can be moved on the map and the route is immediately re-rendered accordingly. You change a segment point into a shaping point, creating new segment points in between.
. Both shaping and segment points can be moved on the map and the route is immediately re-rendered accordingly. You change a segment point into a shaping point, creating new segment points in between.
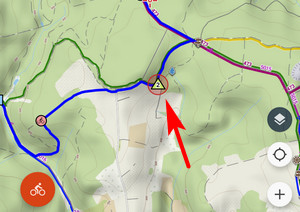
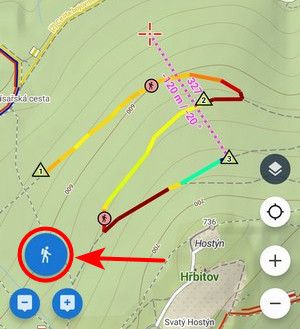
NEVER place the shaping points on intersections! The router must know the direction after the turn to add the proper navigation command. Locus Map marks the wrongly placed shaping points by a red circle:
Set the drawing mode
If you use the route planner for the first time, it will draw the route line in the walking profile. If you want to change it:
- tap the drawing mode button
- tap the routing profile button to open the selection
- select another routing profile
- set additional parameters if necessary and close the dialog
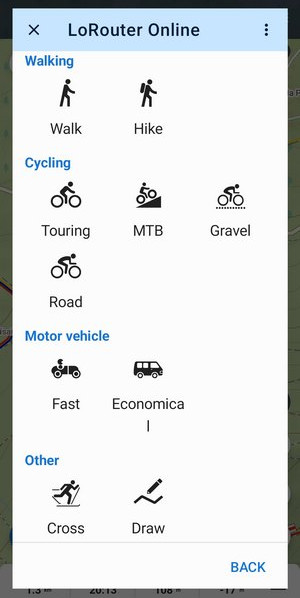
Routing mode
 ,
,  ,
,  etc. - the route line between shaping points is calculated by a router:
The shape of the line depends on selected profile - car or bike routes run along roads, MTB or walking routes along paths etc.
 Each profile has additional parameters that influence the route progress:
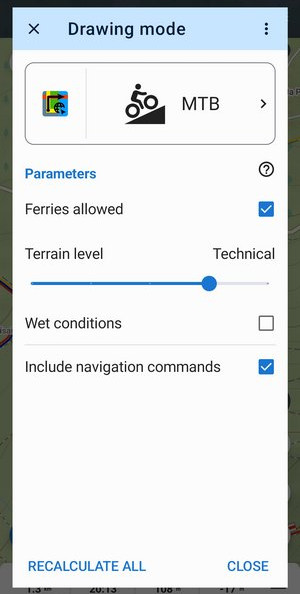
- Include navigation commands - when checked, Locus creates also direction commands related to the new route which can be used for voice navigation.
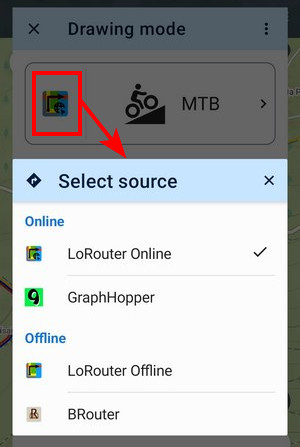
- The router profiles are provided by the selected router. To select a different router, tap the left part of the profile button and choose:

Manual mode
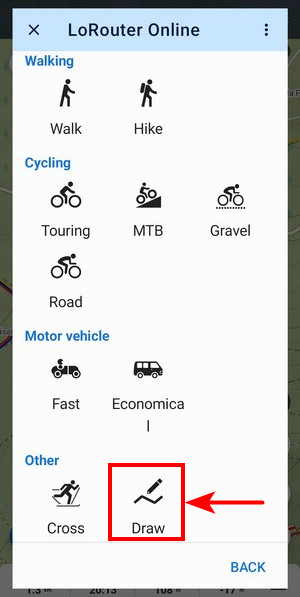
 - only plain line stretches between shaping points:
This is useful for simple distance measurement or for areas not covered by routing data (off-road and off-path areas).
Manual mode can be quickly switched on when you long-press the drawing mode button.

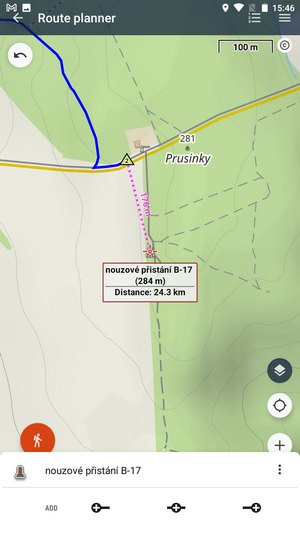
Via points
Via points are places you want to go through when navigating the route - the voice navigation will notify you of them and in case of route recalculation the via points are not detoured.
Via points can be created out of shaping points, LoPoints, your own user points or by defining new points individually.
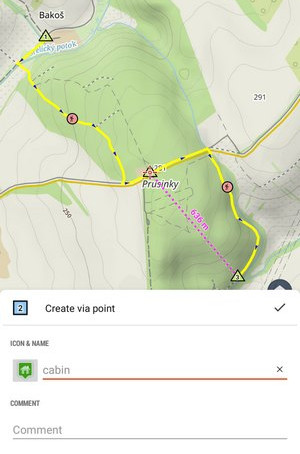
Change to a via point
- tap a shaping point on the map or itinerary and select Change to from the bottom panel:
- tap the via point button
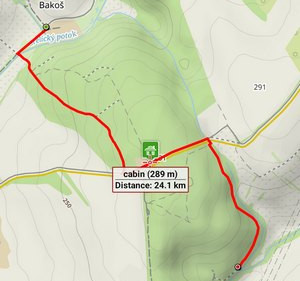
- rename the via point (optional) and confirm. Via point in the planner:
- after saving the route the via point is marked by an icon:


- By moving a via point on the map in the route planner it changes back to a shaping point.
- You can set adding via points as the default instead of the shaping points in the route planner settings.
Add LoPoints
LoPoints can be added to your route too:
- tap a LoPoint on map
- select where to put it in the route - at the start, end or inside:
- when you select to add the LoPoint at the end:
- when you select to add it inside the route:


Add your own points
Your own interesting places or downloaded geocaches can be added to your route:
- display your selected points on map (Menu > Points > select whole folder or individual points)
- add them to your route the same way as LoPoints (see above):

Undo, re-do, remove points
- to remove last added shaping point, tap

- to reverse all edits (adding points, moving them), tap back button(see above, 3)
- to repeat reversed steps, tap forward button(see above, 3)
Itinerary
Shaping and via points are listed in the itinerary. Here you can perform several actions with them:
- change their order by dragging the left part of the list:
- add via points to the itinerary:
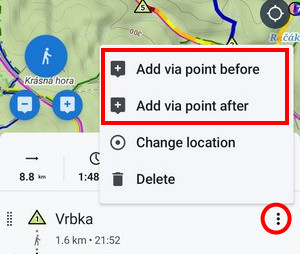
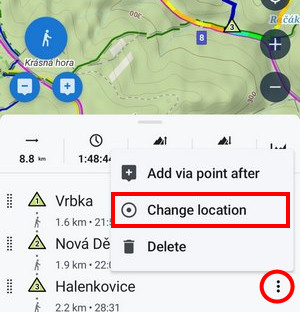
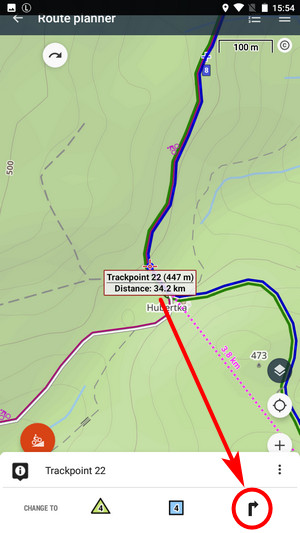
By tapping such a newly added point you can set its location by the location selector - by an address, coordinates, projection, etc. - delete route points
- display route segment details with the option for recalculation in a different profile:

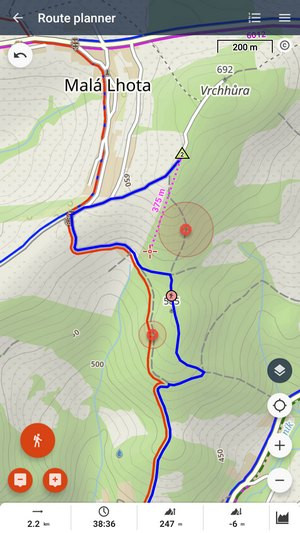
No-go points
If you know a place on the route you can not go through but which is not reflected by the map or routing data - e.g. temporary roadblock, wood harvesting in the forest, flooded area, etc., tell the route planner to avoid it.
- shift the cursor on the spot you want to block and select Add no-go from the route menu:
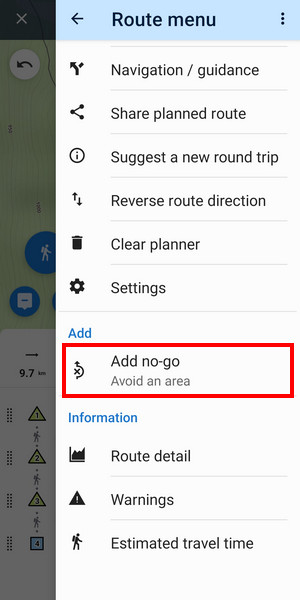
- if necessary, set the means of transport the no-go area is valid for, the area radius (25, 50, 100, 500, 1000 m) and time of validity (tap the no-go area on map):
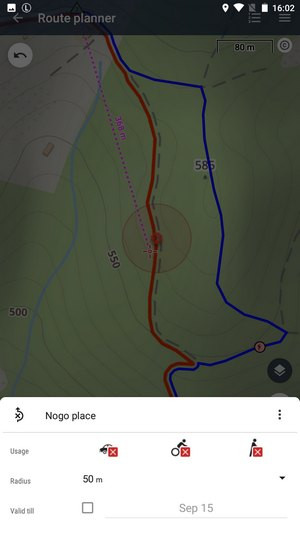
- route planner makes detours around the no-go areas:
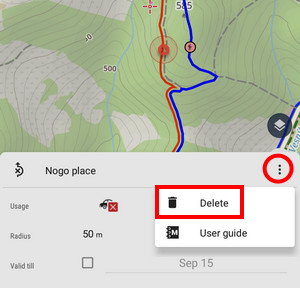
- to delete a no-go area, tap the … menu:
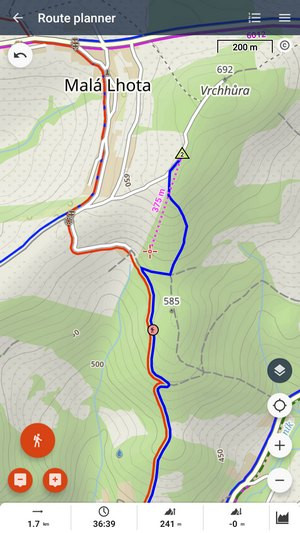
- the route without detours:


Warnings
Available with LoRouter only
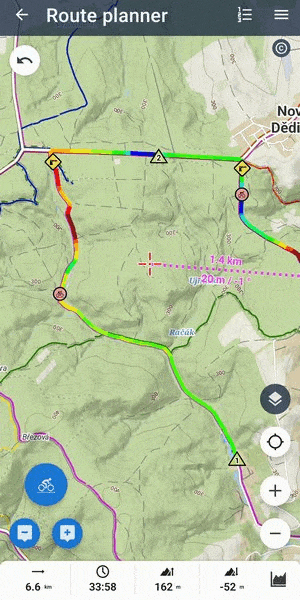
Route planner marks potentially dangerous places on the route (challenging terrain, heavy traffic, barriers, tunnels, unprotected railway crossings, and so on). They are specific for each routing profile, e.g. cobblestones are marked as a “demanding surface” when using a road bike profile. If a warning concerns entire sections of the route, e.g., challenging surfaces or heavy road traffic, it also has a zonal variant:
Warnings are displayed on the route on the map. During navigation along the route, the symbols also appear under the main navigation window:
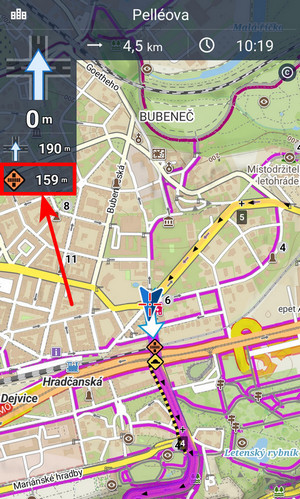
If you tap on any warning symbol on the map, a list of all warnings on the route opens, sorted by distance. The length is also displayed for zonal sections. By tapping, you center the selected place or section on the map.
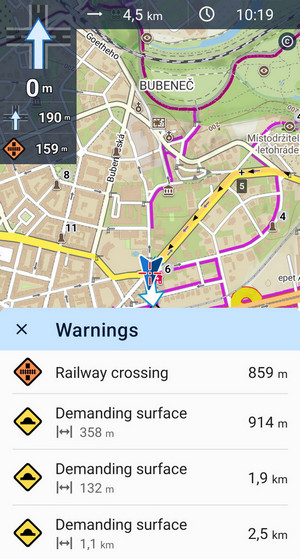 Warnings are also accessible from the route menu:
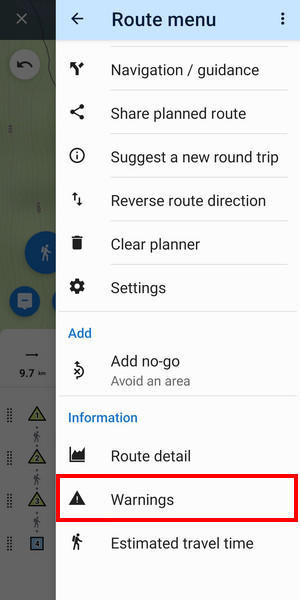
- If you are an adventurous type and you don't need any warnings, you can turn them off in the app settings >>
Route recalculations
Segments
If you changed your mind and you want to use a different activity for a part of the planned route, OR the automatically drawn segment doesn't suit your purposes, you can have it recalculated:
- tap the selected segment point on the map or in the itinerary
- tap recalculate and select another activity
- confirm:
Recalculate all
You can also recalculate the whole planned route for a different activity:
- plan or open a route
- open the drawing mode selector and choose a new routing profile
- tap Recalculate all:

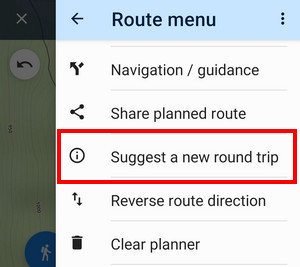
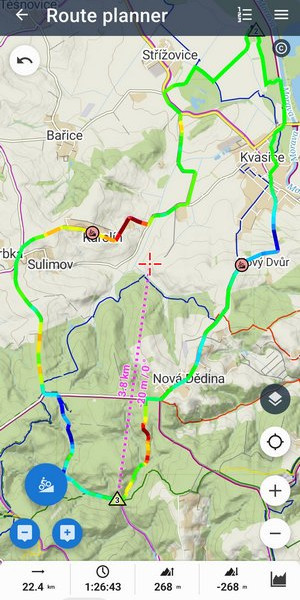
Automatic round trip
Available only with Premium Gold
Locus Map can create your round trip automatically, based on defined distance and direction.
- place the starting point on the map and tap Suggest a new round trip in the route menu
- select activity or means of transport (service is provided by GraphHopper only)
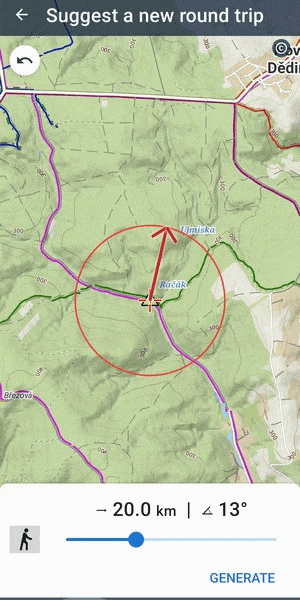
- set direction and distance
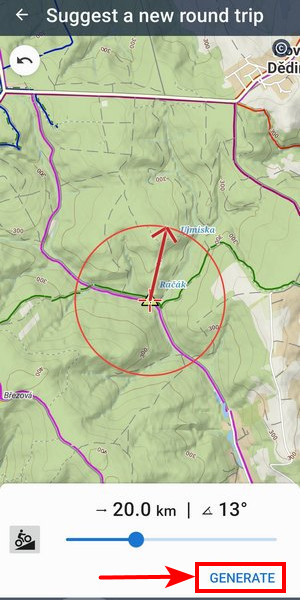
- tap GENERATE


Reverse route direction
This command quickly reverses the whole route and recalculates its stats - elevation gain, ETA, etc.
Stats, charts, weather and estimated travel time
- quick check the distance, estimated time on the route, and the elevation gain - see the bottom bar. The ETT is just approximate.
- elevation chart - Available only with Premium slides up when you tap the chart button:
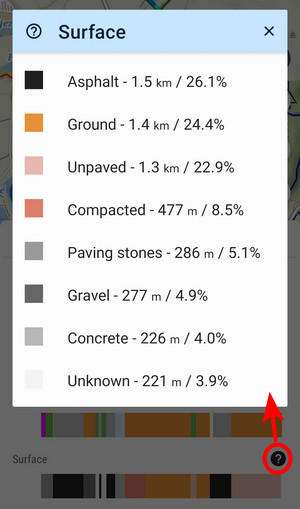
Tap the chart to see the position on the route on the map. - way types and surfaces - Available only with Premium Gold further help to fine-tune your route. They are displayed only when LoRouter is set up. Detailed progress of way types along the route is under the ? button:

Also the surfaces are ordered in a detailed list:
The chart dynamically changes according to your route edits (adding points, moving them…)
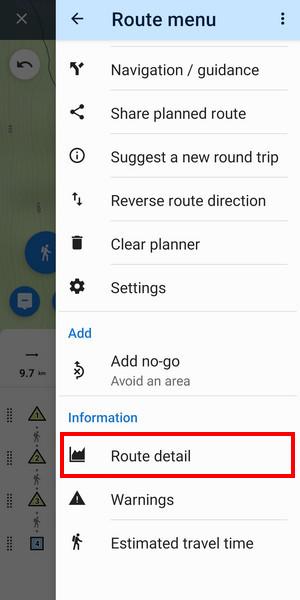
- check more details about the route - Route menu > Route detail:
- Tools:
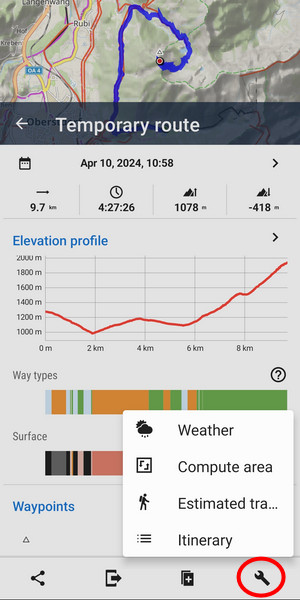
- Weather - forecast for the route for 16 days ahead
- Compute area - area covered by the route
- Estimated travel time:
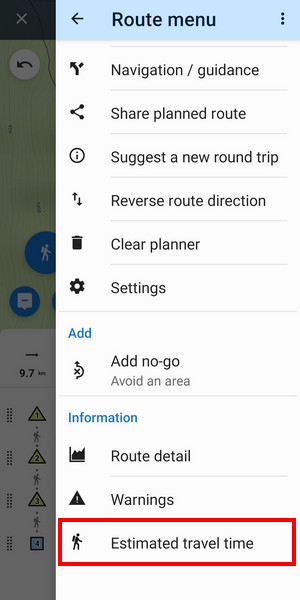
Detailed time prediction. You can select the route activity - 3 types of walk, 9 types of bike and 3 of cross-country skiing.


The ETT is calculated from a combination of various parameters. These include distance, elevation profile, estimated speed, estimated elevation gain/loss per hour or a certain amount of break time specific for particular activities.
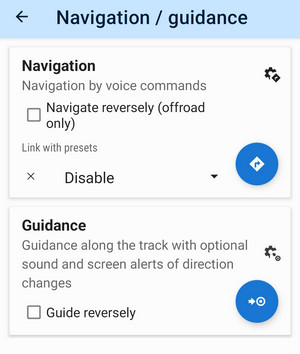
Instant navigation/guidance
You can start navigation along the planned route or guidance right from the route planner:
- open route menu
- tap Navigation/guidance
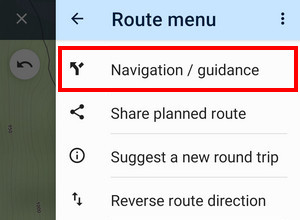
- select the option you need and set additional parameters:

Share planned route
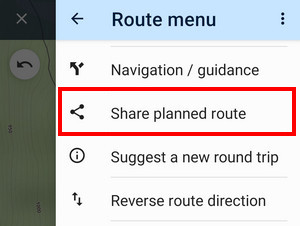 You can quickly share a URL of the planned unsaved route. The shared data contains only shaping points, waypoints and the routing profile and the resulting route is generated on web.locusmap.app.
Save route
When you are done with all edits, save your route!
- tap the saving button in the topbar:
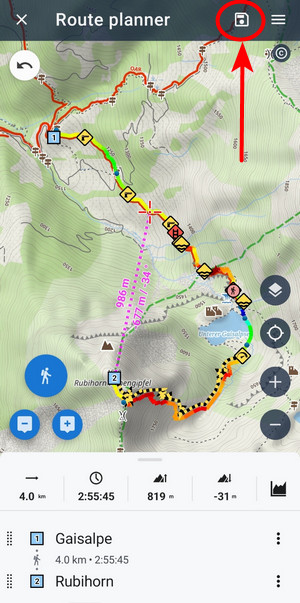
- route saving dialog opens:
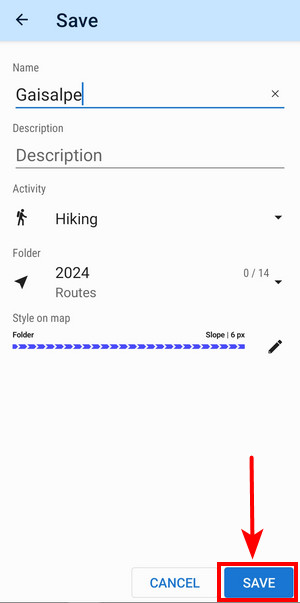
- add name of the route (optional - Locus usually inserts names of the route start/end places automatically)
- add description (optional)
- set activity - good for overall statistics
- select folder - tell Locus Map where to store the route
- set style - color, thickness, pattern… Usually, it is not necessary, the folder style is pre-selected.
- tap SAVE


If you are dissatisfied with your planning or for whatever reason you want to abort all planning, tap Clear planner in the route menu:

“Clear planner” does NOT erase No-go areas. These are kept active even out of route planner, e.g. for navigation. To delete them, tap each no-go area and delete them individually.
Settings
Route menu contains a submenu of setting options:

Line style
 Here you can set the color, width, pattern and other graphical aspects of the route line:

To avoid too steep hills you can set route color to dynamic slope style Available only with Premium and define an unacceptable range of the slope angle, i.e. 10%-30%. Locus will highlight such places for you:

so you can re-plan the route:

Retaining unsaved plan
By default, route planner retains your unsaved plan and offers to continue your work on it when restarted:

If you want a new route plan each time you use the planner, uncheck the option.
Quick drawing
To turn off adding shaping points by tapping the map screen, uncheck this option.

Via points as default
When this option is checked, the route is created from viapoints only:
Measuring area
 Do you want to measure area of your property? Check this option in the menu (or long-press the distance box in the bottom bar), Locus will color the area on map and display the area value in the bottom bar:

Measuring areas works correctly only when convex areas are drawn!
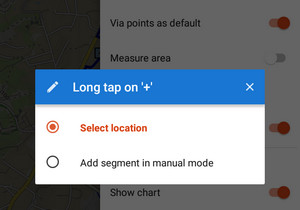
Long tap on +
Here you can define the action after long-pressing the + button for adding points:
Allow edit of navigation points
With this option checked, you can add points with navigation commands or change shaping/via points into them:
Zoom buttons
If you don't need them on the route planner screen turn them off (you can still zoom in/out by pinching or double-tapping/shifting).
Show magnifier
A convenient tool especially for those with weaker eyes - the magnifier always emerges when you move any part of the route.
This setting turns the magnifier on/off also in the track editor.
Using tracks as routes
Tracks can be turned into routes when they are intended for navigation or guidance:
- select a track in My library or tap it on the map
- select Navigate or Guide On or Guide On reverse
Web planner
Visit web.locusmap.app or read more info >>