Translated from English by gtranslate.io
Sidebar
manual:ios:my_lib
Table of Contents
My Library
All your user data - tracks, routes, and points - are managed in My Library. It can be accessed from the Main menu:

Main screen

- the topbar contains a number of displayed/all items, and the library menu
- breadcrumb navigation
- a list of folders, tracks, routes and points
- add content button
Structure of folders
Your data is managed in a structure of folders and sub-folders. Tracks, routes and points can be mixed. Three levels of nested subfolders are available for free. With Premium, you can use up to six levels.
Folder line
Each folder line consists of an icon, a folder name, a number of subfolders, a number of items displayed/hidden on the map, and the eye button, controlling content visibility on the map.

- Tapping it unfolds a list of subfolders and other content in the folder:

- Long-pressing it turns the screen into a quick-edit mode for the selected folder:

Eye button
It controls the visibility of the folder content on the map. You can display all or hide all. Plus, you can include or exclude subfolders.

Adding a new folder
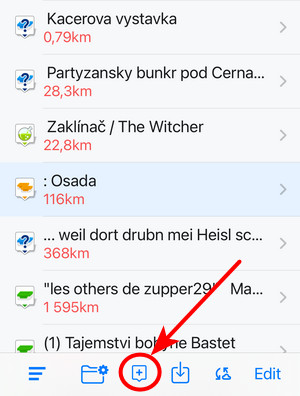
To add a new empty folder to the library, tap + button to open the content-adding dialog and select Add new folder:

The new folder dialog emerges. After inserting the folder name and editing other info about the folder (optionally), tap SAVE:

Icon&Name
Set the icon and the name of the new folder. If you leave it as it is, the name “New folder” will be used.
Line style
The line sample shows what the tracks and routes stored in this folder will look like. To change the color and width, use the controls:

The folder setup can be edited anytime using the folder tools in the library menu.
Library menu
The menu offering essential operations with the content and folders can be opened from the topbar:

Edit
Edit turns the screen into editing and multi-selection mode. The topbar displays the number of selected subfolders, points and tracks/routes. Checkboxes emerge on the left side. Checking them marks the items for one of many mass-editing activities. You can select all items at once by tapping Select all:

Tools menu
The editing mode offers a menu of tools for working with the folder content:

To get back from the editing mode, tap the library menu and select Done:

Visibility
This submenu controls which items included in the currently open folder are displayed on the map and which are not.

- Display all - all content across the folder, including subfolders, is displayed on the map
- Hide all - all content from the current folder that is displayed on the map is hidden
Sort by

- Folders - are sorted alphabetically, by default. Another option is to sort them by the date of creation and update.
- Items - tracks, routes and points in general can be sorted by name, distance, date of creation and date of update. Tracks can also be sorted by advanced parameters:

To get the reverse result of sorting criteria, check the Reverse sorting option.
Folder tools
 Each folder can be edited, moved, exported or deleted.
Edit
Tapping Edit opens a dialog in which you can change the parameters of the folder - the icon, name and style on the map. The parameters are described in detail in the Add new folder paragraph.
Move to
If you want to move the folder elsewhere (up or down its folder tree or to another folder tree), choose this option. The root folder content is displayed. From there, you can browse the whole library and select the target folder. When the selected folder is the last in the tree, you're notified about it:

It is not possible to copy folders.
Export
Exporting the whole folder means that all its content is exported in a single file.
- change the export parameters (optional)
- tap Export to folder
- select target folder on your phone and tap open

- Nested subfolders are not exported.
- At the moment, only the GPX format is available for export.
Delete
Deleting a folder means that all its content is dumped in the trash.
Cloud sync
Available with Premium Gold
By default, Locus Map LITE is synchronized with the apps on other devices and the web library automatically. To check the status or to trigger the sync manually, tap the button in the library menu:

The cloud sync dialog provides options and the status of the latest sync:

Tracks, routes and points
Displaying on the map
To display a selected track/route or point on the map, use the eye button. You can find it both in an open folder:
 or in an item detail screen:

Highlighted eye means the object is visible on the map. Crossed eye means the object is hidden.
Moving
Single item
To move a single track, route or point to another folder:
- long-press the selected item
- tap Move
- browse the Library, find and open the target folder
- tap Select folder:

The move button is also available in an item detail screen:


Multiple items
- tap Edit in the library menu of the source folder
- check the tracks/routes that you want to move
- tap the Move button in the toolmenu
- browse the Library, find and open the target folder
- tap Select folder:
Export
Single item
- open an item's detail screen
- tap sharing button and select Export GPX:

Multiple items
- open the library menu and tap edit
- check the items you want to export
- select Export to GPX from the tools menu:

- all items are exported in one GPX file
Deleting
Single item
- long-press an item in the folder
- tap delete

OR
- open an item's detail screen
- tap delete button in the bottom bar menu:

Multiple items
- open the library menu and tap edit
- check the items you want to export
- select delete from the tools menu:

The deleted data is stored in the trash from where you can restore it or delete it forever.
Track/route detail
When you tap a track or route in the library or on the map, its detail screen emerges:
 The screen consists of a few main parts:
Track/route preview
- tapping the preview displays the track on the main map screen and closes the track detail screen:

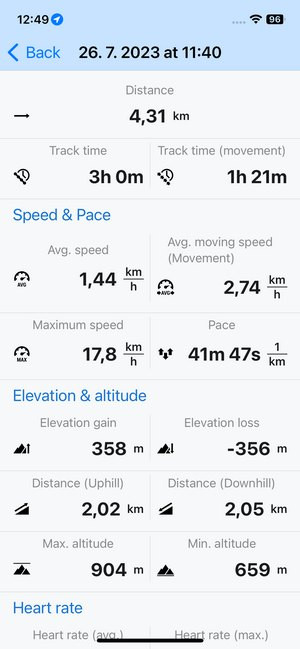
Statistics
- by default, basic stats are displayed - date and time of the track creation, length, time on the track, elevation gain and loss
- tapping the basics opens a screen with the detailed stats:

Chart
- by default, an elevation chart of the track or route is displayed. You can easily change it to the chart of speed:
- sometimes the GPS measuring of elevation is not correct due to weather or terrain conditions. To optimize the elevation chart, you can apply filtering:


Waypoints
- list and itinerary of waypoints and navigation points (not fully functional yet due to missing navigation feature):
- when you tap a waypoint in the itinerary, its detail displays:


Best interval
- if the track is recorded and contains data related to its time progress, the best interval is displayed here (shortest time on a km or a mile). Tapping unfolds the time progress along the whole track:

Details
Information about the activity on the track (or planned route), the style of the track line and the folder where it is stored:

Sharing tracks and routes
You can share a track or route via a link that displays it on web.locusmap.app:
- open a track detail screen
- tap the sharing button at the bottom
- tap the web link button. You can either share the link with a selection of apps that can process the link further - send it over Airdrop, Messages, etc. or store it in Notes and other apps:
 OR, you can copy the link to the clipboard.

Everybody who has the link can view the track on the web. If you decide to hide it from others, tap Make it private in the sharing dialog. The link becomes inactive:

Editing tracks and routes
You can edit the name, add description, change the activity and line style.
- to open the editing screen, tap the button in the bottom bar of the track detail screen:

- to change the name or add a description, tap the relevant boxes, and the keyboard slides up:

- to change the activity on the track or route, open the popup menu:

- to change the style of the route line, turn off the folder style and change the color and width:

- tap SAVE to confirm the changes


Creating a new point
If you want to create a new point of interest, you can do so on the main screen or in a selected point folder. The first option offers a selection of folders where to store the point, the latter stores the point directly in the selected folder.
Main screen
- place the cursor on the spot where you want to create the point
- tap the New point button
- fill in the new point form (optionally) - point name, icon, folder and other info, add attachments
- tap Save

Folder
- place the cursor on the spot where you want to create the point
- open My library > select the folder into which you want to store the point
- tap the Add new point button in the tool menu:
- fill in the new point form (optionally)
- tap Save

Point detail
To display a point detail screen, tap it on the map or in the Library.
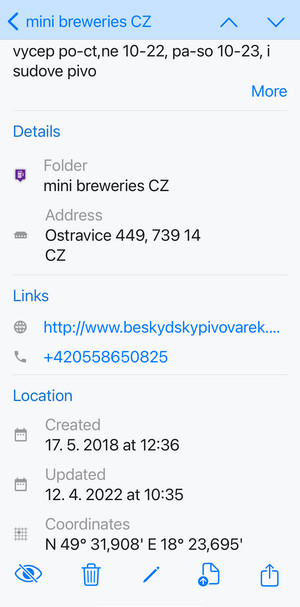
 It displays:
- map preview - tapping it opens the main map screen with the point centered
- point name, distance and elevation
- description (if available)
- details - folder, address
- links (if available) - URL, email, phone number
- location - dates of creation and update and coordinates

Geocache detail also displays basic information like difficulty or terrain.

Sharing points
To share a point of interest, tap the sharing menu button in the point detail bottom bar:
 There are several ways of sharing a point:
- as a link displaying the point at web.locusmap.app. You can copy it, store it or send it via available services:

- as a link displaying the point in Apple Maps or other map apps
- you can also start the navigation to it in Apple Maps and other apps

Editing points
To edit a point of interest:
- open its detail screen and tap the pencil button in the bottom bar:

- you can change the name, icon, description, address, links, e-mails and phone numbers

- tap SAVE when you're done


Import
You can import tracks, routes and points to the app via a GPX file. You can do so in two ways:
- by tapping a GPX file in your file browser
- within Locus Map app
File browser
- tap the selected GPX file in your phone's file browser
- tap the “share” button and select Locus Map
- the content of the GPX is displayed on the map:

- it is stored in the Imported sector of the Library:


Within app
You can import a GPX directly to a selected folder:
- open a selected folder in your Library
- tap Import in the tool menu > tap Select GPX file
- a file browser opens > select the GPX file for import > Open
- Locus Map displays info about the imported file
- the file is in the folder:

Apple Health
You can also easily import activities from Apple Health:
- open a track folder in your Library
- tap the Apple Watch button in the tool menu:

- select activity from the list and tap Import:

- the activity is imported to Locus Map:

- including all detailed statistics:


Trash
Deleting tracks, routes and points from the Library folders moves the data to the trash:

- if you change your mind and you want to restore an item from the trash swipe it to the right and tap Restore. The item returns to its original folder:
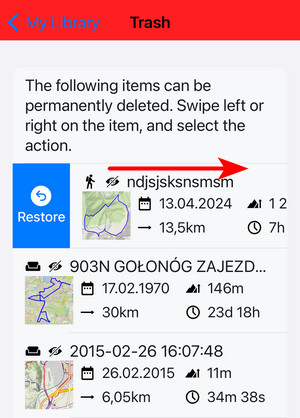
- to delete an item permanently, swipe it to the left and tap Delete:

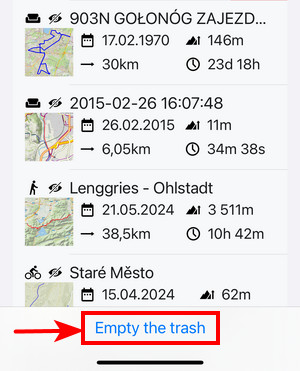
- to empty the trash completely, tap Empty the trash at the bottom:


manual/ios/my_lib.txt · Last modified: by mstupka
Except where otherwise noted, content on this wiki is licensed under the following license: CC Attribution-Share Alike 4.0 International
