Translated from English by gtranslate.io
Sidebar
manual:ios
This is an old revision of the document!
Table of Contents
![]()
Locus Map Lite
iOS version of Locus Map
About
An early stage of the iOS variant of outdoor navigation app Locus Map, full-featured and popular on Android devices. Development started from scratch in 2023.
In May 2024, the app offers the following:
- LoMaps online - outdoor map suitable for hiking and biking, available online only
- LoMaps Ski - online map for winter activities
- Satellite map - aerial and satellite imagery with labels
- LoPoints - dynamic points of interest with tourist information, Wikipedia and users' photos
- Search - worldwide online search of places and addresses
- My Library - database of user's tracks, routes and points, synced with the web library and other devices
- Track recording - multi-profile recording of sports activities
FAQ for early adopters
Can I import my workouts from Apple Fitness?
- You can import outdoor workouts recorded with an Apple Watch or another tracking device and stored in the Fitness app.
Can I sync the iOS app with my Android phone?
- Yes, you can. Just use the same Locus account you use on your Android phone. And make sure you have the Premium Gold active.
How can I plan routes for the iOS app?
- On Locus Web Planner. When you save the route, it is synced with the mobile app.
Can I import a route in GPX to the app?
- Yes, you can do so via Locus Web Planner - import the file into it, save it to My Library and the route is synced with Locus Map on your iPhone
Does the app use offline maps?
- Not yet, we've still been working on it - we hope offline maps are soon to be added. At the moment, all maps are streamed from the internet.
Can the app navigate?
- Not yet. You can display the route on the screen and see your position on it.
Can the app guide to points, e.g. geocaches?
- Not yet. But you can display the geocaches on the screen and monitor your current GPS location.
Map screen
The main screen of the app displays the map, your current location and basic controls:

- Map scale - related to the selected zoom
- Attribution - copyright od the map data and interface provider
- Cursor - the pointer displaying info about POIs, defining places for creating user points, etc.
- Current location - your location according to GPS and other sensors
- Track recording - starts recording your activity
- Map selection - opens the map selection dialog
- Centering and map rotation - one tap centers the map screen on your location. Double tap rotates the map according to the compass
- Zooming - buttons for fluent map zooms changing
- Main menu - opens the general selection of app features and settings
- Function panel - buttons for quick search launch, adding a new point, and displaying GPS status.
Map control
- you can shift the map by simple touching and dragging

- zoom it in/out by pinching
 . If you prefer single-hand control, double-tap and drag the map to zoom it. Otherwise, use the zooming buttons.
 - to place your GPS location in the middle of the map screen, tap the centering button:

- to rotate the map according to your heading or by compass, tap the centering button again:

You can also rotate the map manually with two fingers.
Map selection
Tap the map selection button and select among hiking/biking, winter and satellite maps:

LoPoints

About
LoPoints are dynamic points of interest that you can display above the map. Each LoPoint marks the location and category of a particular place and contains additional information - e.g. opening hours, WWW, phone number, and other attributes. They are based on OpenStreetMap and Wikipedia from which they take descriptions and photos.
Locus Map users can add their own photos to LoPoints to make them more attractive and up-to-date.
LoPoint detail
When you tap a LoPoint on the map, its detail panel pops up. It displays the distance from your location, its elevation and a lot of information important for tourists including Wikipedia or user photos:

Another swipe-up reveals the whole information tab:

Search
todo
Track recording
Do you want to keep track of your workout or show your trip to your buddies? Record it:
- tap the track recording button:

- select recording profile according to your activity (walk, cycling…) and press the big green START button:

- track recording panel starts showing your track stats:
 and your track is being recorded. The active recording is marked by the red button and the line of the track drawing behind the cursor:

- when your trip is over, stop the recording - tap the red button on the map screen and then the STOP button on the panel:

- if necessary, change your track name (time stamp is the default), description, activity and folder where the track should be stored, and press SAVE:

- when the track is properly saved, its detail panel slides up:

Recording profiles
Locus Map can record various activities outdoors. Each activity has its own track recording profile adjusted to the character of the activity. When you start track recording, your last used profile is selected.
Selection
When you want to record another activity, tap the chosen profile to open the selection. Tap another profile and then the Select button:

Changing parameters
You can reconfigure every profile - change its name, activity, preferred storage folder, line style and other parameters. To do so, tap the selected profile to open its details:
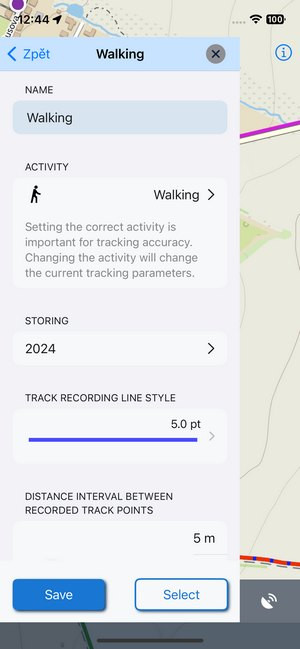 When you are done with the editing, tap Save:

Adding new profile
The basic profile selection only contains cycling, MTB and walking. If you want to add another activity, tap the + in the bottom left corner:
 A new profile emerges in the selection. Tap it and change its parameters according to your needs. Don't forget to Save the new profile:

My Library
todo
manual/ios.1715777655.txt.gz · Last modified: by mstupka
Except where otherwise noted, content on this wiki is licensed under the following license: CC Attribution-Share Alike 4.0 International
