Translated from English by gtranslate.io
Sidebar
manual:user_guide:my_library
Table of Contents

My Library
All your user data - tracks, routes, and points - are managed in the Library. It can be accessed from:
- for a quicker access you can add
 button to the Function panel at the bottom or right side of the screen


Main screen

- breadcrumb navigation
- a list of folders, tracks, routes and points
- add content button
Structure of folders
Your data is managed in a structure of folders and sub-folders. Tracks, routes and points can be mixed. Three levels of nested subfolders are available for free. With Premium, you can use up to six levels.
Folder line
Each folder line consists of an icon, a folder name, a number of subfolders, a number of items displayed/hidden on the map, and the eye button, controlling content visibility on the map.

- Tapping it unfolds a list of subfolders and other content in the folder:

- Long-pressing it turns the screen into editing mode and checks the pressed item:

Eye button
It controls the visibility of the folder content on the map. You can display all or hide all. Plus, you can include or exclude subfolders.

Adding a new folder
To add a new empty folder to the library, tap + button to open the content-adding dialog and select New folder:

The new folder dialog emerges. After inserting the folder name and editing other info about the folder (optionally), tap ADD:

Parent folder
This is pre-filled by the name of the folder from which you triggered the request for the new folder. If you want to change this, tap the parent folder name to open the selection of a different parent folder.
Icon&Name
Set the icon (optional) and the name (mandatory) of the new folder.
Line style
Tapping the line sample opens a dialog to set a folder-specific line style for tracks and routes stored in this folder. Otherwise, the general line style is applied.
Point label
Here you can set a folder-specific behavior of the map labels for points.
- Never - point labels are never displayed
- On hover - point labels appear when the map cursor hovers over the point
- Always - point labels are permanently visible
- General settings - the point labels/screens behavior submits general settings made in Settings > Points&Tracks
Track label
Here you can set a folder-specific behavior of the map labels for tracks and routes.
- Do not show - no labels are displayed
- Simple - a track starting point displays a simple label with the track name
- Complex - a track starting point displays a label with the track name, length, positive and negative elevation
- General settings - the track labels behavior submits general setting of track labels
Circles around points
This option is primarily useful for geocachers - according to Geocaching.com rules, physical parts of individual geocaches may be placed at least 528ft/161m from each other. This function helps visualize such an area:

The folder setup can be edited at any time using the folder tools in the library menu.
Library menu
The menu offering essential operations with the content and folders can be opened from the topbar:

Visibility
 This submenu controls which items included in the currently open folder are displayed on the map and which are not.
- Display all - all content across the folder, including subfolders, is displayed on the map
- Hide all - all content from the current folder that is displayed on the map, is hidden
- Invert - all hidden content is displayed and vice versa
Select

Select turns the screen into editing and multi-selection mode:
The topbar displays the number of selected subfolders, points and tracks/routes. The “eye” buttons change to checkboxes. Checking them marks the items for one of many mass-editing activities. Besides the checkboxes, there are also other options for selection:

- Select all - all items in the current folder are selected, including subfolders
- Select displayed - all tracks, routes and points displayed on the map screen are selected
- Deselect all - all checkboxes are unchecked
- Invert selection - all checked items are unchecked and vice versa
Tools menu
The editing mode offers a wide menu of tools for working with the folder content. The menu items availability changes according to the content checked for editing:

To get back from the editing mode, tap the arrow button on the top left:

Sorting
 Sorting options are different for the (sub)folders and user content within the current folder:

- Folders - are sorted alphabetically, by default. Another option is to sort them manually. Tapping the option opens an extra dialog in which the folders can be shifted up or down to change their order:

- Items - tracks, routes and points in general can be sorted by name, distance, date of creation and date of update. Tracks and geocaches can also be sorted by advanced parameters:


To get the reverse result of a sorting criteria, check the Reverse sorting option:

Filtering

All user content within the selected folder can be filtered according to a set of criteria. The filter has three layers. Each of the layers has its parameters:
- Basic - general criteria common for tracks, routes and points:

- Points - point-related criteria like icons, max. distance or parameters of geocaches - this level can be disabled when the folder contains no points or when you don't want to filter points

- Tracks - additionally, tracks and routes can be filtered by activity:

This level can also be disabled when the folder contains no tracks or routes or when you don't want to filter this type of data.
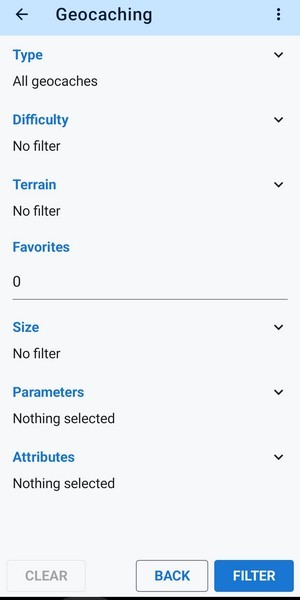
Geocaching
Geocachers can filter downloaded caches by a wide range of criteria available in the geocaching filter submenu:
How to activate a filter?
- define filter criteria (see above)
- tap FILTER at the bottom:

- the filtered items display in the folder, others are hidden
- an active filter is marked by a green dot in the menu:

- to display the filtered items on the map, tap Show on map:

Or tap Display all on the folder's eye button. - to deactivate the filter, open the filter dialog and tap CLEAR:

How to save a filter?
- define filter criteria
- tap Filters manager

- insert the new filter name and tap SAVE

- if you want to overwrite a saved filter, tap overwrite in the action menu of an existing filter:

- to activate a saved filter, tap the filter name and then FILTER
- to delete a saved filter, tap delete in the action menu:

Folder tools
 Each folder can be edited, moved, exported or deleted.

Edit
Tapping Edit opens a dialog in which you can change the parameters of the folder - the parent folder, icon and name, style on map, etc. The parameters are described in detail in the Add new folder paragraph.
Move to
If you want to move the folder elsewhere (up or down its folder tree or to another folder tree), choose this option. The root folder is displayed (see the root folder icon at the beginning of the breadcrumb navigation):
 From there you can browse the whole library and select the target folder. When the selected folder is the last in the tree, you're notified about it:

It is not possible to copy folders.
Export
Exporting the whole folder means that all its content is exported in a single file:

The selection of the export formats depends on the content of the folder. This is offered in case of mixed content of tracks and points:

Delete
Deleting a folder means that all its content is removed from the database and from all synced devices. So please think carefully before such a step. Locus Map displays a warning before the final delete including a confirmation checkbox. Checking it activates the deleting button:

Cloud sync
Available only with Premium Gold
 Selecting this option from the topbar menu opens a dialog for manual synchronization of your data with the cloud and other devices using the same Locus account. Your points, tracks and routes are then automatically synchronized with your web library via Locus cloud service. This happens after every change of your data - when a track is recorded, route planned etc. More details here >>
It is necessary to perform the first synchronization with the cloud manually. This way your web database is created.
Style
 The library user interface can be modified according to your preferences. You can change the layout and list mode:

Layout mode
- Simple - default setting
- Advanced - all tools and menus are placed in the bottom bar (similarly to the “old” library)

List mode
- Slim - items in the list are compacted and some info is hidden
- Full - default. Each item line is more spacious, containing more information.
Search
 To search for your tracks, routes or points, tap
 ![]() in the topbar. You can search in full-text, according to location, in subfolders, folder names and descriptions (tap the settings button to see more options):
in the topbar. You can search in full-text, according to location, in subfolders, folder names and descriptions (tap the settings button to see more options):

Fulltext
If you need to search for an item by a text string in its title, start typing in the search field and the items start emerging in the list of results:

Nearest tracks and points
To get a list of the nearest tracks, routes or points, tap one of the location preference switches:
 Of course, you can combine both methods, full-text search and location preference.
You can also quickly display the nearest points from the content panel.
Adding content
It is possible to add content directly to the library by the adding dialog:

The adding button is available across the whole library and it adds content to the currently opened folder.
- New point - this way, you create a new point on the map at the default location. The point detail dialog appears with the preselected folder. More about adding points >>
- Photo point - this option launches the camera. After taking the photo, the app creates a new point on the map at the default location with the attached photo. More about photo points >>
- Track recording - selecting this opens the track recording panel. The recorded track is saved into a folder pre-selected in the related track recording profile.
- Route planner - this way you can plan a new route. It is saved to the last used folder.
Import
 Use this to get any content from outside of Locus Map into the app.
- Start with the selection of the source storage:

- Check the options regarding the individual items of the imported content and tap IMPORT:


The Import button is universal - with it, you can also import maps, map items, or even a Locus Map backup file
manual/user_guide/my_library.txt · Last modified: 2025/04/04 10:15 by mstupka
Except where otherwise noted, content on this wiki is licensed under the following license: CC Attribution-Share Alike 4.0 International
